Linux驱动开发:7、设备 |
您所在的位置:网站首页 › linux 设备节点创建 › Linux驱动开发:7、设备 |
Linux驱动开发:7、设备
|
目录
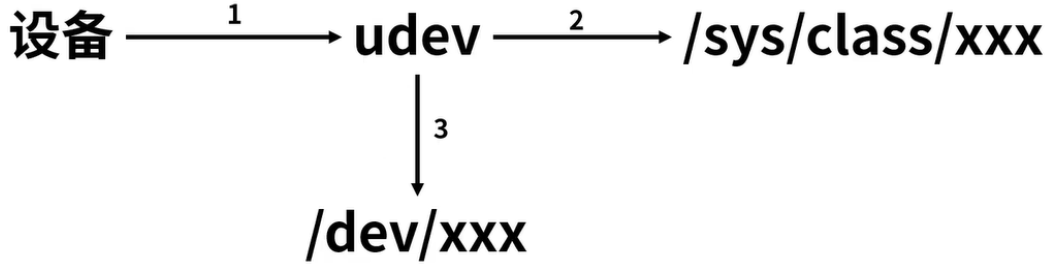
🍅点击这里查看所有博文 随着自己工作的进行,接触到的技术栈也越来越多。给我一个很直观的感受就是,某一项技术/经验在刚开始接触的时候都记得很清楚。往往过了几个月都会忘记的差不多了,只有经常会用到的东西才有可能真正记下来。存在很多在特殊情况下有一点用处的技巧,用的不多的技巧可能一个星期就忘了。 想了很久想通过一些手段把这些事情记录下来。也尝试过在书上记笔记,这也只是一时的,书不在手边的时候那些笔记就和没记一样,不是很方便。 很多时候我们遇到了问题,一般情况下都是选择在搜索引擎检索相关内容,这样来的也更快一点,除非真的找不到才会去选择翻书。后来就想到了写博客,博客作为自己的一个笔记平台倒是挺合适的。随时可以查阅,不用随身携带。 同时由于写博客是对外的,既然是对外的就不能随便写,任何人都可以看到。经验对于我来说那就只是经验而已,公布出来说不一定我的一些经验可以帮助到其他的人。遇到和我相同问题时可以少走一些弯路。 既然决定了要写博客,那就只能认真去写。不管写的好不好,尽力就行。千里之行始于足下,一步一个脚印,慢慢来 ,写的多了慢慢也会变好的。权当是记录自己的成长的一个过程,等到以后再往回看时,就会发现自己以前原来这么菜😂。 本系列博客所述资料均来自互联网资料,并不是本人原创(只有博客是自己写的)。出于热心,本人将自己的所学笔记整理并推出相对应的使用教程,方面其他人学习。为国内的物联网事业发展尽自己的一份绵薄之力,没有为自己谋取私利的想法。若出现侵权现象,请告知本人,本人会立即停止更新,并删除相应的文章和代码。 前言在前面两小节中,我们学习到了设备注册。可以将一个设备驱动注册到内核中。设备注册完成后,还需要通过mknod指令在用户空间中手动创建该驱动对应的设备节点。 root@ubuntu:# mknod /dev/hello_test0 c 237 0该命令在执行是不会检查参数的合法性。也不会检查设备驱动是否存在。如果系统中所有的驱动都通过该方法创建设备节点,就会出现一个问题。当设备未接入时,就可能会出现很多的设备节点。 实际上Linux内核为我们提供了一组函数,可以在模块加载的时候自动在/dev目录下创建相应设备节点,并在卸载模块时删除该节点,当然前提条件是用户空间移植了udev。 udevudev是一个工作在用户空间的工具,它能根据系统中硬件设备的状态动态的更新设备文件,包括设备文件的创建,删除,权限等。这些文件通常都定义在/dev 目录下,但也可以在配置文件中指定。 当插入新设备—>加入驱动模块—>在sysfs上注册新的数据后,udev会自动创建新的设备节点。udev运行在用户模式中,而并非内核中。
内核中定义了struct class结构体,顾名思义,一个struct class结构体类型变量对应一个类。代码中出现的class指的是 设备类(device classes),是对于设备的高级抽象。但 实际上class也是一个结构体,只不过class结构体在声明时是按照类的思想来组织其成员的。 /** * struct class - device classes * @name: Name of the class. * @owner: The module owner. * @class_attrs: Default attributes of this class. * @dev_groups: Default attributes of the devices that belong to the class. * @dev_kobj: The kobject that represents this class and links it into the hierarchy. * @dev_uevent: Called when a device is added, removed from this class, or a * few other things that generate uevents to add the environment * variables. * @devnode: Callback to provide the devtmpfs. * @class_release: Called to release this class. * @dev_release: Called to release the device. * @suspend: Used to put the device to sleep mode, usually to a low power * state. * @resume: Used to bring the device from the sleep mode. * @ns_type: Callbacks so sysfs can detemine namespaces. * @namespace: Namespace of the device belongs to this class. * @pm: The default device power management operations of this class. * @p: The private data of the driver core, no one other than the * driver core can touch this. * * A class is a higher-level view of a device that abstracts out low-level * implementation details. Drivers may see a SCSI disk or an ATA disk, but, * at the class level, they are all simply disks. Classes allow user space * to work with devices based on what they do, rather than how they are * connected or how they work. */ struct class { const char *name; struct module *owner; struct class_attribute *class_attrs; const struct attribute_group **dev_groups; struct kobject *dev_kobj; int (*dev_uevent)(struct device *dev, struct kobj_uevent_env *env); char *(*devnode)(struct device *dev, umode_t *mode); void (*class_release)(struct class *class); void (*dev_release)(struct device *dev); int (*suspend)(struct device *dev, pm_message_t state); int (*resume)(struct device *dev); const struct kobj_ns_type_operations *ns_type; const void *(*namespace)(struct device *dev); const struct dev_pm_ops *pm; struct subsys_private *p; };内核同时提供了class_create宏。用于动态创建设备的逻辑类,并完成部分字段的初始化,然后将其添加进Linux内核系统中。此函数的执行效果就是在**/sys/class/**目录下创建一个新的文件夹,此文件夹的名字为此函数的第二个输入参数。 class_create 一共有两个参数,参数 owner 一般为 THIS_MODULE,参数 name 是类名字。返回值是个指向结构体 class 的指针,也就是创建的类。 /* This is a #define to keep the compiler from merging different * instances of the __key variable */ #define class_create(owner, name) \ ({ \ static struct lock_class_key __key; \ __class_create(owner, name, &__key); \ }) /** * class_create - create a struct class structure * @owner: pointer to the module that is to "own" this struct class * @name: pointer to a string for the name of this class. * @key: the lock_class_key for this class; used by mutex lock debugging * * This is used to create a struct class pointer that can then be used * in calls to device_create(). * * Returns &struct class pointer on success, or ERR_PTR() on error. * * Note, the pointer created here is to be destroyed when finished by * making a call to class_destroy(). */ struct class *__class_create(struct module *owner, const char *name, struct lock_class_key *key) { struct class *cls; int retval; cls = kzalloc(sizeof(*cls), GFP_KERNEL); if (!cls) { retval = -ENOMEM; goto error; } cls->name = name; cls->owner = owner; cls->class_release = class_create_release; retval = __class_register(cls, key); if (retval) goto error; return cls; error: kfree(cls); return ERR_PTR(retval); }函数device_create用于动态创建逻辑设备,对新的逻辑设备进行相应初始化,然后将此逻辑设备加入到Linux内核系统的设备驱动程序模型中。 device_create是个可变参数函数,参数 class 就是设备要创建在哪个类下面。参数 parent 是父设备,一般为 NULL,也就是没有父设备。参数 devt 是设备号。参数 drvdata 是设备可能会使用的一些数据,一般为 NULL。参数 fmt 是设备名字,如果设置 fmt=xxx 的话,就会生成/dev/xxx这个设备文件。返回值就是创建好的设备。 /** * device_create - creates a device and registers it with sysfs * @class: pointer to the struct class that this device should be registered to * @parent: pointer to the parent struct device of this new device, if any * @devt: the dev_t for the char device to be added * @drvdata: the data to be added to the device for callbacks * @fmt: string for the device's name * * This function can be used by char device classes. A struct device * will be created in sysfs, registered to the specified class. * * A "dev" file will be created, showing the dev_t for the device, if * the dev_t is not 0,0. * If a pointer to a parent struct device is passed in, the newly created * struct device will be a child of that device in sysfs. * The pointer to the struct device will be returned from the call. * Any further sysfs files that might be required can be created using this * pointer. * * Returns &struct device pointer on success, or ERR_PTR() on error. * * Note: the struct class passed to this function must have previously * been created with a call to class_create(). */ struct device *device_create(struct class *class, struct device *parent, dev_t devt, void *drvdata, const char *fmt, ...) { va_list vargs; struct device *dev; va_start(vargs, fmt); dev = device_create_vargs(class, parent, devt, drvdata, fmt, vargs); va_end(vargs); return dev; }该函数会自动地在/sys/devices/virtual目录下创建新的逻辑设备目录。并将其软连接到/sys/class/目录中对应的类下。同时还会在/dev目录下创建与逻辑类对应地设备文件。 root@ubuntu:# ll /sys/class/hellocls/ total 0 lrwxrwxrwx 1 root root 0 Sep 17 06:11 hellodev -> ../../devices/virtual/hellocls/hellodev root@ubuntu:# ll /dev/hellodev crw------- 1 root root 237, 0 Sep 17 06:11 /dev/hellodev 代码实现示例代码实现也比较简单,完成设备的注册后。class_create创建一个hellocls的类,该函数最终会在/sys/class目录中创建一个名为hellocls的文件夹。device_create函数将设备驱动存放到hellocls类中,并创建对应的设备文件。 static int hello_init(void) { int result; printk("hello_init \n"); result = register_chrdev( major, "hello", &hello_ops); if(result printk(KERN_ERR "class_create() failed for cls\n"); result = PTR_ERR(cls); goto out_err_1; } devno = MKDEV(major, minor); class_dev = device_create(cls, NULL, devno, NULL, "hellodev"); if (IS_ERR(class_dev)) { result = PTR_ERR(class_dev); goto out_err_2; } return 0; out_err_2: class_destroy(cls); out_err_1: unregister_chrdev(major,"hello"); return result; } static void hello_exit(void) { printk("hello_exit \n"); device_destroy(cls, devno); class_destroy(cls); unregister_chrdev(major,"hello"); return; } 实验结果测试程序如下,打开/dev/hellodev字符设备。紧接着关闭掉。 #include #include #include #include main() { int fd; fd = open("/dev/hellodev",O_RDWR); if(fd |
【本文地址】
今日新闻 |
推荐新闻 |